How to Make a Paper Wreath – Dahlia Inspired {Under $10 to Make!}
The weather is soaring into the 60’s this week and it is giving me the itch to get our house ready for Spring.
The first change in our house is with the mantel, it was decorated top to bottom for Valentine’s Day and screamed winter. Some of the changes that I will be making are; adding a new wreath, making a sign and decorating a few fun vases to fill with beautiful spring flowers.
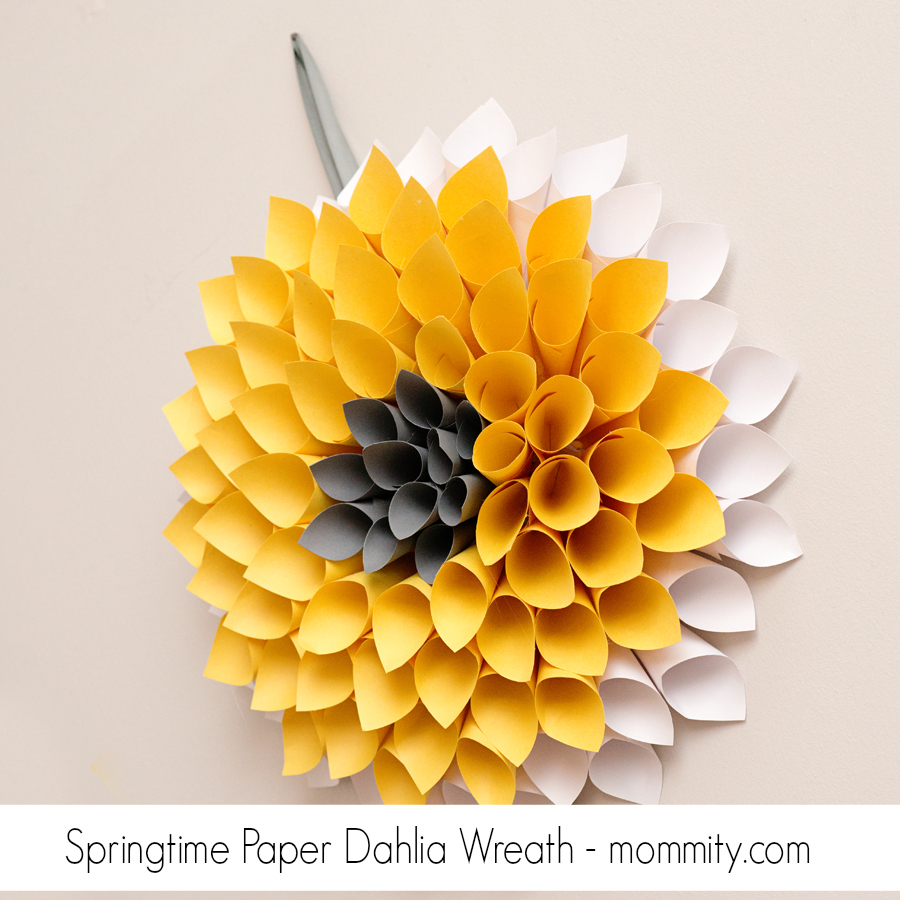
My theme this year is yellow, grey and white. I love this combination and it’s definitely one that can take you from Spring into Summer.
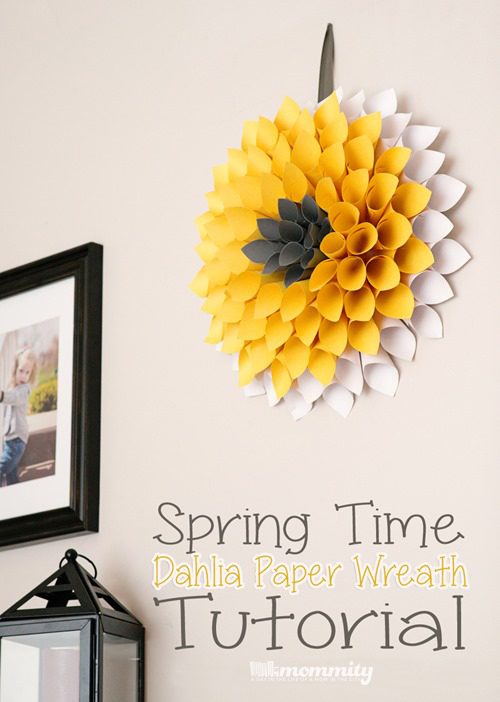
We are on a budget for this project and I am planning to do this entire mantel makeover for under $50. First stop, the wreath! I decided on a paper wreath with inspiration of the Dahlia flower. From start to finish, this project was done for less than $10!
What you need:
- Yellow, white and grey construction paper. You can use card stock or even scrapbooking paper, but our budget allowed for construction paper. This is the main cost of a paper dahlia wreath.
- Hot Glue Gun
- Piece of Cardboard
- Scissors or paper cutter. I recommend a paper cutter for this project as it will produce nice clean lines and it’s much quicker for the job
- Compass
We had pizza for dinner so I became resourceful and cut off the top of the box to use for my wreath. Pizza boxes are great because they are sturdy and so easy to cut into. But any piece of cardboard will work for this.
Using a compass, draw a 10 inch diameter circle and cut it out. Then on the same piece of cardboard draw another circle with a 8 inch diameter.
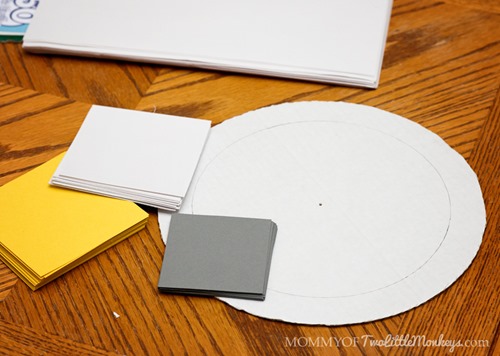
Then take your yellow and white construction paper and cut them into 4 x 4 squares, on my wreath I used about 70 yellow, 30 white and about 11 grey. Your wreath might use more or a little less, depending on how tight you make your cones.
Cut the grey paper into 3 X 3 as this will be the center of your flower.

Take each paper and wrap it just like a cone, leaving it open on top and closed at the bottom. Using your hot glue gun, place a little glue under the seam so it stays closed.
To place it onto the cardboard, pinch the bottom of your cone flat and hot glue it onto the line that you drew on the cardboard. Leave about a finger width space in between each cone.
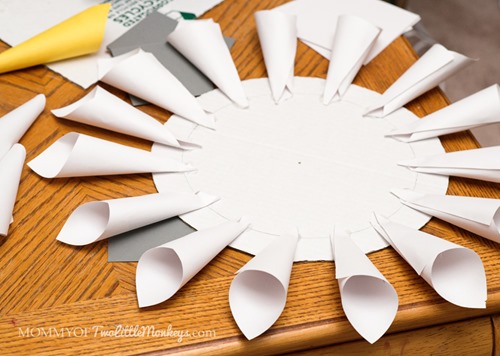
Then when you get to the second row, place the cones in between the spaces creating a layering effect.
Do this all the way until you get into the middle of your flower.
On my flower, I did two rows of white, 4 rows of yellow and filled the rest with the grey paper. Finish it off by hot gluing a ribbon to the back for hanging.
This project is really easy to do, even for someone who isn’t much of a crafter (ME!) It turned out so cute and will look perfect next to my sign that is in progress now.


Why can I not roll a pretty cone? Is there a secret I don’t know?:)
Thank you. Your instructions were thorough and to the point. I’m making flowers tomorrow for an event next week.
I got to make this ASAP, I love it my kitchen curtains have sunflowers on I have them on top of my fridge .Thanks for the info
Do you move the rows in as you go?
My mom has dementia but used to love to craft- i try to make wreaths w her for seasons and holidays- this is perfect- thank you- already have the supplies, just going to get everything ready for her.
What a great idea!! I bet they will love them 🙂
yes! I did the same thing, I thought it would be heavier than it is. Such an adorable project! I made 3 of them for mothers day!
Hi Jen! I just grabbed a ribbon or twine, hot glued the two ends together on the back and hung the loop up on the wall. Held with no problems!
Question! How do you go about hanging these up? I’m in the process of making one 🙂
THANKS!
-Jen
Just love this paper Wreath.I am a crafter that ?’s to make things, of all kinds.thank you.
I was looking for something to go on my blankbwall.Thank you.
This is a fun group project. This is a great time for group projects, the oil painting, people getting together to do coloring pages. With the holidays coming up and using holiday paper, green and red or blue and silver to create decorations for parties or the home. People get a pre-cut stack of paper which they can exchange with others to make the wreath their own. It’s something that can be created each season or used as decoration for a celebration. How about a 16th birthday celebration? Thanks for sharing!!
I want to do a Fall wreath. I cant wait to see what it looks like. Thanks.
my first post says it is awaiting moderation. Not sure what that means, but I wanted to know what size wreath your 10″ base ended up measuring? I want to make a few different sizes and just needed to know how big/small my cardboard circles need to be to achieve different size wreaths. I await your reply. Hopefully
I want to make a few of these in various sizes. How big did your 10″ base measure when the wreath was complete?
Kathy, I just purchased a regular package of construction paper (50 sheets) for each of the colors and didn’t even use half of the package. The amount you use, and how many squares you need, will depend on the size of your wreath and how tightly you roll the cones. Hope that helps!
I am excited to do this project for the redecorating of my bedroom…Since I LOVE to craft but need very detailed instructions because Im not “crafty” can you tell me how many pieces of construction paper you had to purchase? I see how many squares of each color I need to cut after I purchase the paper. Thank you for your help!
You can use cardboard cake rounds as the base….get whole pack at Jo-ann fabrics plus use a coupon and save more money.
love making it as a decoration for my moms classroom
So glad you loved it! Check out our holiday one too 🙂 Perfect for Christmas decorating! https://mommity.com/paper-christmas-wreath/
I just made this when I saw your tutorial! Awesome! It turned out really cute, thank you! It was just the pop of color I needed for my dining room
I made this wreath as a Christmas decoration. I really like your as well.
I made this wreath as a Christmas decoration. I really like your as well.
I really enjoyed doing the wreaths. Although it got a little difficult for me to do the center. But overall, good. Thank you!
I love your wreaths! They bring back fond memories of ones that my mom made in the 1960’s when I was little. She used old computer punch cards, but she assembled it with all points sticking out and spray painted it gold and added glittery Christmas ornaments. Thanks!
I laughed so hard when I saw your comment WAH LAH! You do know that’s from the french word Voila, meaning here it is?
Thank you!
Love your diy projects
Lovely idea for a wreath!
Shall try to make one myself
WOW …. This project certainly has the WOW factor. Thank you for sharing it.
thank-you for sharing; staff at Central Elementry
Albemarle N.C. project for classrooms is going
to be awesome ( spring theme )
Wow, that is too cute! I can’t believe you made that for under $10!!
Ok, I think I am going to HAVE to do this! It turned out so totally cute!
I love those colors! One of my favorite color schemes. The flower is beautiful!
Wow! Great job! I love this. It looks so good, yet it’s so easy!
I am so loving this! I’ve not seen anything like it before, and it’s just perfect for spring.
Wow! I really like the crisp look this gives! I love Dahlias to! Very easy craft to do with my 12 yrold son who is Mr. Crafter! I don’t have a blog, just floating around Pinterest an saw this an it caught my eye. Gonna try it out! Thanks for sharing this!